Track Night in America Driven by Tire Rack isn’t about ultimate on-track speed, nor is it about building the most modified vehicle – it’s about filling your personal fun cup. The more Track Nights you do, though, the more comfortable you’re going to get behind the wheel; you’re then going to push a little harder, run a little faster, and, in the process, ask a little bit more from your vehicle – and thus begins the list of modifications you’ll undoubtedly want to make to your vehicle to make it perform better. First always comes brakes, tires, shocks, springs, and swaybars, but one thing you’ll also want to consider is expanding your car’s cooling capabilities via an oil cooler. While this is more of a “level 2” kind of mod, it’s something you can easily do yourself with hand tools, a little patience, and the right advice.
Hagerty.com/media recently penned a story titled “7 Tips for Plumbing Your Car,” and within it, author Kyle Smith runs through – you guessed it – seven tips for automotive fluid plumbing success. From brake lines to power steering, Smith’s story covers a variety of custom plumbing scenarios, but all of these tips apply to people building a custom oil cooler setup for your engine, transmission, or (if you opt to go hardcore) differential.
The seven tips begin with the obvious: Take your time. “This is a step that can make or break a project and it is best to take the moment ahead of actually picking up tools and parts to lay out a plan,” Smith writes. “What systems need plumbing? What materials are needed? Are there any techniques you’ll need for the job that you should try out now?”
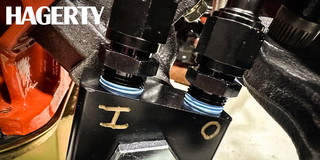
Next, mark the direction of flow, says Smith. We can tell you from experience that installing an oil cooler on an early model Miata utilizing an oil filter sandwich adapter results in blindly spinning on the adapter under the intake manifold, leaving you with little idea which fitting holes are “out” and “in.” In tight situations, clear markings on the adapter can enable you to use a cell phone or mirror to view which tube goes where. “Labels can be as boring or as interesting as you can imagine,” Smith says. “A simple label by hand with a permanent marker is enough to get by but consider using zip ties or heat shrink to color code inlet and outlet hoses to prevent accidentally misassembling items in the future.”
Of the other tips, some standouts are allowing movement of the tubing, using AN fittings, and squaring up hose ends. As Smith describes: “If there is one little detail that always catches my eye, it’s nicely square-cut hose ends. They fit on fittings cleaner, and when clamped correctly have a very finished look despite being the simplest and cheapest way of joining a hose. Using proper hose cutters or taking the time to dress the end of a hose with a razor knife is basically free and can add a subtle touch that elevates your project from ‘thrown together’ to ‘nicely detailed.’”
Read all seven automotive plumbing tips by clicking the link below.
Photo by Kyle Smith / Hagerty


